How to Accept Stablecoin Payments: A U.S. Guide

You can accept stablecoin payments today by enabling a hosted crypto checkout or integrating a payment gateway API, then deciding whether receipts settle on-chain to your wallet or auto-convert to USD. For most U.S. merchants, the fastest path is a hosted checkout or payment links with fiat auto-conversion, which gets you live in hours rather than weeks.
Three immediate actions to take:
- Choose your acceptance model: hosted checkout or payment links for speed; direct API or SDK for UX control and marketplace payouts.
- Decide your settlement mode: on-chain stablecoin settlement to your own wallet, or custodial auto-conversion to USD via bank rails.
- Enable compliance onboarding and run sandbox tests before processing real transactions.
The core tradeoff is straightforward. Hosted checkout is fast and low-maintenance but gives you less control over the payment UX. A direct API gives you full control but requires more engineering time and a clear custody plan. Settlement timing matters too: on-chain settlement is near-instant but leaves you holding stablecoins; fiat conversion adds a spread but removes crypto exposure from your books.
Stablecoin adoption is accelerating. Stablecoins are moving toward mainstream use and analysts note they could reshape parts of the U.S. Treasury market as institutional and merchant volume grows.
Key Takeaways
Accepting stablecoin payments requires choosing an integration path, a settlement mode, and a compliance posture before writing a single line of production code.
| Point |
Details |
| Start with hosted checkout |
Payment links and hosted checkout get you live in hours; move to direct API only when UX control or marketplace payouts require it. |
| Settlement mode drives cost |
Non-custodial on-chain settlement leaves you holding stablecoins; fiat auto-conversion adds a spread of roughly 0.5%–1.5% but keeps your books in USD. |
| Allowlist tokens and chains |
Enforcing accepted tokens and chains at checkout prevents wrong-chain payments, the most common source of lost funds in production. |
| Compliance starts with your gateway |
Using a regulated gateway shifts money-transmitter obligations away from you; prepare AML documentation before bank onboarding. |
| Cryptopayr for fast go-live |
Cryptopayr supports 110+ cryptocurrencies, non-custodial settlement, and platform plugins for a low-friction production launch. |
Table of Contents
How do stablecoin payments actually work end-to-end?
Understanding the full payment flow saves you from debugging surprises at 2 AM. Here is the sequence from customer wallet to your ledger:
- Customer initiates payment. Your checkout generates a payment address (or a QR code) for a specific token and chain. The customer’s wallet signs and broadcasts the transaction.
- Transaction hits the mempool. The blockchain network picks up the transaction. Confirmation time ranges from a few seconds on Solana or Polygon to roughly 15–30 seconds on Ethereum L2s, to several minutes on Ethereum mainnet during congestion.
- Gateway detects the transfer. Your payment gateway (custodial or non-custodial) monitors the target address. Once the required number of block confirmations is reached, it marks the payment as confirmed.
- Webhook fires. The gateway sends a signed webhook event to your server with the payment ID, amount, token, chain, and transaction hash. Your server updates the order status and triggers fulfillment.
- Ledger update and reconciliation. Your accounting system records the receipt, captures the exchange rate at the moment of confirmation, and logs the transaction hash for audit purposes.
- Settlement. Funds either stay in your on-chain wallet (non-custodial) or the gateway converts them to USD and initiates a bank payout on a scheduled cycle.
Key roles in this flow:
- Payer wallet: the customer’s self-custody or exchange wallet.
- Acquiring gateway: custodial (holds funds on your behalf) or non-custodial (routes directly to your wallet).
- Settlement layer: on-chain transfer or fiat rails via a banking partner.
- Reconciler/ledger: your internal system that maps blockchain events to orders and accounting entries.
One critical difference from card payments: on-chain transfers are final. There is no issuing bank to reverse a transaction. Refunds are a separate on-chain transfer back to the payer’s wallet, not a reversal. Stripe’s stablecoin documentation confirms this model: refunds return stablecoins to the payer’s wallet rather than reversing the original transaction. Design your customer support and refund workflows around this from day one.
For idempotency, always key your webhook handler on the payment ID plus transaction hash. Gateways can retry webhook delivery; processing the same event twice should not double-credit an order. Stablecoins are finding strong product-market fit particularly in cross-border use cases where card rails are slow or expensive, so expect a meaningful share of your international customers to prefer this rail.
What integration options should developers consider?
Four patterns cover nearly every merchant scenario. Pick based on how much UX control you need and how fast you need to ship.
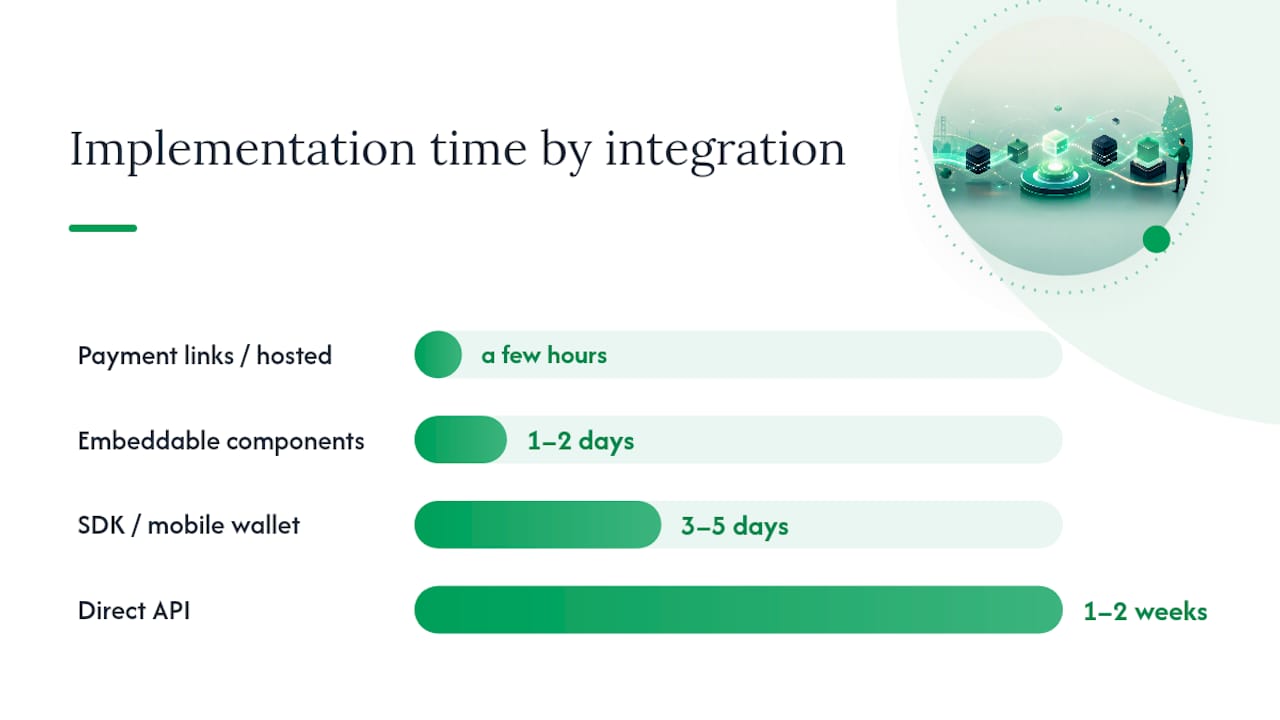
Payment links and hosted checkout are the fastest path. You generate a link or redirect customers to a gateway-hosted page. The gateway handles wallet detection, token selection, and confirmation UX. Time to implement: a few hours. Custody stays with the gateway until settlement. Best for SaaS subscription pages, donation flows, and any merchant who wants zero frontend crypto code.

Embeddable components (sometimes called Elements or widgets) let you drop a pre-built checkout UI into your own page. You control the surrounding design; the component handles the crypto-specific UX. Time to implement: one to two days. Good for e-commerce stores that want a branded experience without building a custom wallet connector.
SDKs and mobile wallet integrations are relevant when you need native iOS or Android checkout flows, or when you want to support WalletConnect-style deep links. Time to implement: three to five days depending on platform. Common in gaming and digital goods apps where the customer already has a mobile wallet.
Direct API (Payment-Intent-style) gives you full control. You call the gateway API to create a payment intent, receive a payment address and expected amount, poll or subscribe to status updates, and handle all UX yourself. Time to implement: one to two weeks for a solid production integration. Best for marketplaces, platforms with complex payout logic, or merchants who need to embed stablecoin acceptance inside a larger checkout flow.
| Integration pattern |
Best for |
Complexity |
Settlement options |
| Payment links / hosted checkout |
SaaS, donations, simple stores |
Low |
Fiat conversion or on-chain |
| Embeddable components |
E-commerce, branded checkout |
Medium |
Fiat conversion or on-chain |
| SDK / mobile wallet |
Gaming, digital goods apps |
Medium |
On-chain, sometimes fiat |
| Direct API |
Marketplaces, complex platforms |
High |
Full flexibility |
Pro Tip: Allowlist the specific tokens and chains you accept at the checkout level. Enforcing payment options at the gateway prevents customers from sending USDT on the wrong chain, which is one of the most common sources of lost funds and support tickets in production.
For custom or complex builds, a blockchain development partner like Proud Lion Studios can accelerate the integration, particularly for mobile wallet connectors and smart-contract-based checkout flows.
Which stablecoins and networks should you support?
Start narrow. USDC and USDT together cover the large majority of merchant stablecoin volume. USDC is issued by Circle and is widely used in U.S.-regulated contexts. USDT (Tether) dominates global trading volume and is the token most international customers already hold. PayPal’s PYUSD is an example of a major payments firm issuing its own stablecoin, signaling that the token landscape will keep expanding, but USDC and USDT remain the practical starting point for merchant acceptance.
For a deeper comparison of the two, the USDT vs. USDC tradeoff guide on the Cryptopayr blog covers issuer risk, liquidity, and chain availability in detail.
Network selection matters as much as token selection:
| Network |
Gas cost |
Confirmation speed |
Developer tooling |
Notes |
| Ethereum mainnet |
High |
1–3 minutes |
Excellent |
Best for large transactions |
| Polygon |
Low |
2–5 seconds |
Good |
High volume, low cost |
| Arbitrum |
Low |
1–3 seconds |
Good |
EVM-compatible L2 |
| Base |
Low |
1–2 seconds |
Growing |
Coinbase-backed L2 |
| Solana |
Very low |
Under 1 second |
Good |
Non-EVM, separate tooling |
| Tron (TRC20) |
Very low |
1–3 seconds |
Moderate |
Dominant for USDT globally |
A note on USDT TRC20: if you want to accept USDT TRC20, Tron is the network to enable. It carries the highest USDT transaction volume globally and very low fees, but it uses a separate SDK and address format from EVM chains. Cryptopayr’s USDT acceptance page covers the chain-specific setup.
Common caveats to handle before launch:
- Token contract addresses differ by chain. USDC on Ethereum and USDC on Polygon are different contracts. Your gateway must enforce the correct contract per chain.
- Wrapped tokens are not the same as native tokens. Wrapped USDC on a bridge is not the same as native USDC. Reject wrapped variants unless you explicitly support them.
- Wrong-chain payments are the most common merchant support issue. Allowlisting at checkout (see the integration section above) is the fix.
The practical recommendation is to start with USDC and USDT on two or three low-cost chains (Polygon, Base, or Tron for USDT). Add Ethereum mainnet for customers making large transfers. Expand to Solana or other networks only when customer demand makes it worth the additional tooling overhead.
How should you handle settlement, reconciliation, and refunds?
Settlement mode is the decision with the biggest operational impact. Three options:
- Non-custodial on-chain settlement: funds go directly to your merchant wallet on confirmation. You hold the stablecoins. No conversion spread, but you carry crypto on your balance sheet and must manage your own treasury.
- Custodial gateway with fiat conversion: the gateway holds funds and converts to USD, then initiates a bank payout. You pay a conversion spread (typically 0.5%–1.5% depending on provider and volume) but your books stay in USD.
- Hybrid: receive on-chain, then queue a batch conversion at scheduled intervals. Useful when you want to hold some stablecoin for treasury purposes and convert the rest.
Reconciliation steps for any settlement mode:
- Map each incoming transaction hash to an order ID at the moment of webhook receipt.
- Capture the exchange rate (stablecoin-to-USD) at the exact time of confirmation, not at payout time.
- Record the gateway fee and any conversion spread as separate line items.
- Use an event-driven reconciler that listens to webhook events rather than polling the blockchain directly.
Pro Tip: Log the transaction hash, token, chain, amount, and exchange rate in your order record at the moment the webhook fires. Trying to reconstruct the rate hours later from an exchange API introduces reconciliation errors that are painful to unwind at month-end.
Refunds work differently than on card rails. There is no chargeback mechanism. To refund a customer, you initiate a new on-chain transfer of the stablecoin amount back to their wallet. If you auto-converted to fiat, you need either a stablecoin reserve or a gateway that manages refund routing on your behalf. Partial refunds follow the same logic: a separate on-chain transfer for the partial amount. Build this into your customer support playbook before launch, not after your first refund request.
How do you test a stablecoin integration before going live?
A structured test plan prevents the most common production failures. Run these in order:
- Configure sandbox credentials. Use your gateway’s testnet mode and connect to the appropriate test network (Sepolia for Ethereum/EVM, Solana devnet, or Polygon Mumbai if still available).
- Fund a test wallet. Get testnet tokens from a public faucet for your target chain. Most EVM testnets have faucets accessible with a Google login.
- Run a successful payment end-to-end. Initiate a payment, confirm the webhook fires, verify the order status updates, and check the ledger entry.
- Test a wrong-chain attempt. Try sending a token on a chain you have not allowlisted. Confirm the gateway rejects it and the order stays pending.
- Test a partial payment. Send less than the required amount. Verify the gateway holds the order open and your UX shows the correct pending state.
- Test webhook replay. Replay the same webhook event twice. Confirm your handler is idempotent and does not double-credit the order.
- Test a refund. Initiate a refund from your dashboard or API. Confirm the on-chain transfer reaches the test wallet and the order status updates correctly.
- Validate accounting entries. If using auto-convert-to-fiat, confirm the exchange rate was captured at confirmation time and the ledger entry matches the expected USD amount.
Additional QA checklist items:
- Verify UX messaging for pending confirmations (do not show “payment complete” until the required block confirmations are reached).
- Test gas-fee spike behavior: confirm the gateway does not reject valid payments because estimated gas changed between quote and submission.
- Check rate-limit behavior on your webhook endpoint under burst conditions.
- On networks prone to short reorgs (some EVM chains), confirm your gateway waits for sufficient confirmations before marking a payment final.
What U.S. compliance and banking requirements apply?
This is where many merchants underestimate the work. The regulatory picture for stablecoin acceptance in the U.S. is still evolving, and Brookings’ analysis of stablecoin regulation outlines the major open questions policymakers are working through, including reserve requirements, issuer licensing, and consumer protection rules.
The practical compliance considerations for a U.S. merchant:
- Money transmitter risk: if you hold customer funds in transit, you may be operating as a money transmitter under FinCEN rules and state law. Using a regulated gateway that holds funds on your behalf shifts this obligation to the gateway, not you. Confirm your provider’s regulatory status before assuming you are covered.
- KYC/AML: regulated gateways perform KYC on merchant onboarding. You generally do not need to KYC your customers for standard payment acceptance, but if you operate a marketplace or process payouts to third parties, your obligations increase.
- Bank relationships: your bank will ask about your crypto activity. Have documentation ready: your gateway provider’s regulatory status, your AML policy, and your fiat conversion flow. Banks that work with crypto businesses expect to see a clear on/off-ramp path and documented controls.
- On/off-ramp options: partner-managed fiat conversion (the gateway handles it), in-house treasury with an exchange relationship, or staged conversion via a regulated custodial partner. Most U.S. merchants start with partner-managed conversion and move in-house as volume grows.
Compliance documentation to prepare before bank onboarding:
- Gateway provider’s FinCEN registration or state money transmitter licenses.
- Your AML/BSA policy (even a one-page version for small merchants).
- Fiat conversion partner documentation.
- Transaction monitoring policy.
Regulated, API-first platforms reduce merchant onboarding friction compared with building internal crypto-handling systems, and they come with the compliance infrastructure banks expect to see. For most U.S. merchants, choosing a regulated gateway partner is the faster and lower-risk path than building your own custody and conversion stack.
What does stablecoin payment processing actually cost?
Fee structures vary by settlement choice. The main components:
Three example scenarios for a $1,000 transaction:
Gas cost near zero. No conversion spread. Total cost: approximately $1.00. You hold USDC or USDT.
Bank payout fee = $0 (ACH). Total cost: approximately $15.00. You receive USD.
Total cost: approximately $10.50. You receive USD once per day.
The break-even point versus card rails depends on your average order value and how often cards decline for international customers. Visa’s stablecoin materials note that stablecoins are increasingly positioned as a complementary rail alongside card networks, not a replacement.
When evaluating providers, ask specifically about: custody model, settlement timing, FX spread methodology (mid-market vs. proprietary rate), monthly minimums, and whether gas fees are passed to the customer or absorbed.
What is the recommended approach for most U.S. merchants?
Start with hosted checkout or payment links plus optional auto-convert-to-fiat. This gets you live quickly, keeps your books in USD, and lets you validate customer demand before investing in a deeper API integration. Once you have volume and understand your customers’ preferred tokens and chains, move to a direct API integration for tighter UX control and marketplace payout features.
Cryptopayr fits this path well. It supports 110+ cryptocurrencies including USDC and USDT across multiple chains, offers both hosted checkout and a full API, and provides plugins for WooCommerce, Easy Digital Downloads, and other platforms. The non-custodial settlement option means funds go directly to your wallet without the gateway holding them, which simplifies your compliance posture. For merchants who want fiat conversion, that option is available too.
Integration quickstart:
- Sign up and complete merchant onboarding on Cryptopayr.
- Enable stablecoin payments and select your accepted tokens and chains.
- Choose your settlement mode (on-chain to your wallet or auto-convert to fiat).
- Run sandbox tests using the steps in the testing section above.
- Go live with monitoring on your webhook endpoint and reconciler alerts for failed conversions.
Pro Tip: For SaaS platforms worried about card decline rates, stablecoin acceptance is a direct fix for international customers where card rails fail most often. The Cryptopayr blog covers this use case with specific implementation patterns.
What most guides get wrong about stablecoin integration
The biggest mistake I see in production integrations is treating stablecoin payments like a card payment with a different input field. They are not. The failure modes are completely different, and the teams that struggle most are the ones who find out after launch.
Wrong-chain payments are the most preventable problem and the most common one. A customer sends USDT on Ethereum when your checkout expected USDT on Tron. The funds are gone from their wallet, not in yours, and recovering them requires manual intervention at the gateway level, if it is possible at all. Allowlisting tokens and chains at the checkout level is not optional; it is the single most important UX decision you will make.
The second mistake is skipping the exchange-rate snapshot. Teams that capture the rate at payout time rather than at confirmation time end up with reconciliation gaps every time the market moves between those two events. It sounds minor until you are trying to close the books on a month with hundreds of transactions and the numbers do not add up.
Start with one or two chains. Log every transaction hash at capture. Set up reconciler alerts for failed conversions before you go live. These three habits prevent the majority of production incidents I have seen teams deal with after launch.
Cryptopayr gets you live faster than building it yourself
The real cost of a stablecoin integration is not the gateway fee. It is the engineering time spent on custody decisions, webhook reliability, reconciliation logic, and compliance documentation. Cryptopayr handles the infrastructure so your team focuses on your product.
The non-custodial settlement option means your funds go directly to your wallet. The hosted checkout and payment links options mean you can be live today.
Most merchants complete sandbox testing and go live within one to three business days. Start with the Cryptopayr gateway to explore the full integration options, or browse the full token and plugin catalog to confirm your stack is supported.
Sources
This article is general information, not a substitute for advice from a qualified financial advisor. Consult a qualified financial professional about your own circumstances before acting on anything here.
Recommended